Roundabouts, rotaries, or traffic circles, are unique segments of roadway in the Waze router. When a driver approaches a roundabout, a specific icon
is displayed in the turn direction area of the display with a number corresponding to the exit count from the driver’s entry into the roundabout.
Creation from an intersection

First, move the junction to the center of the roundabout.
- Click and drag the junction to where it should be.
- adjust the incoming segments so that they align with the roads leading into the roundabout.
If roads have been added, removed or reconfigured in other ways near the roundabout, make these changes now.

Oftentimes roundabouts are completed before aerial imagery is updated. In these cases, enable the GPS tracks layer in the map editor by pressing Shift+G, and use the tracks to guide your preparations.
Once all preparations are made, Hover the mouse over the ![]() button, on the toolbar at the top of the page. Choose “Roundabout” (Shortcut key: o).
button, on the toolbar at the top of the page. Choose “Roundabout” (Shortcut key: o).

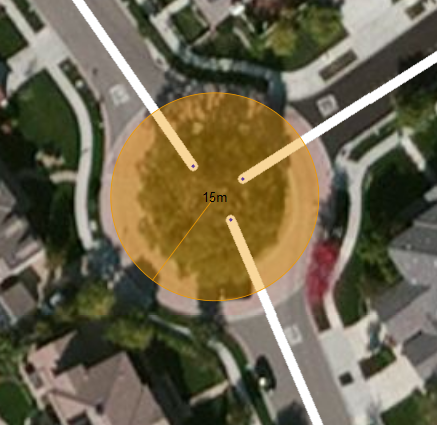
1. Move the cursor to the center of the actual roundabout. The cursor will be a crosshair + to indicate that it is in roundabout creation mode.
2. Click once at the center and then move the mouse any direction towards the perimeter of the roundabout. An orange circle will grow and shrink as you move the mouse, with the numbers in the center of the circle displaying the radius of the resulting roundabout.

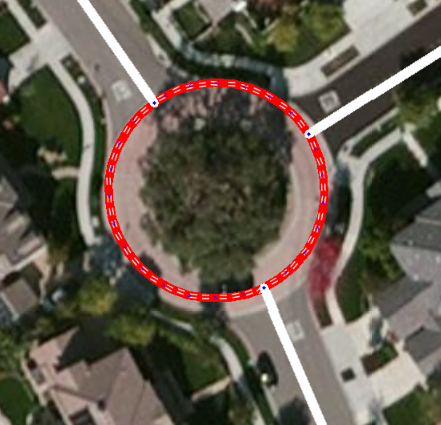
3. Click once when satisfied with the size and shape of the roundabout, which will create new 1-way segments in between each road segment contacted by the edge of the orange circle. Each approaching segment is disconnected from the junction in the center and reconnected to the roundabout with allowed turns already set, but with some turns unconfirmed. Make sure that each turn is confirmed.

Like all new roads, each roundabout segment needs the country, state and city filled in. Please see the updating details to confirm the road section for details on this process.
Roundabout should have no street name. Select “none” as street name.
The road type of the roundabout is always the same as the highest road type connected.
Other considerations:
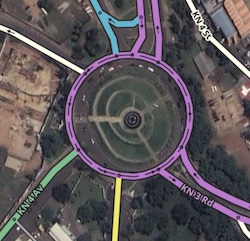
- If this roundabout is a local landmark, such as Sonatube Roundabout in Kigali, an area place may also be drawn inside it with the Park and/or Junction/Interchange categories, as appropriate.
Creation from nothing
-
1
-
2
-
3
-
4


- Draw single road segments that will lead to the roundabout and ensure they extend into the center of the roundabout area. Use the visual map or gps points to align the roads.
- Hover the mouse over the
 button, on the toolbar at the top of the page. Choose “Roundabout” (Shortcut key: o).
 - Click the mouse on the map at the center of the roundabout area.
- Move the mouse cursor outside, up to the middle of where the roundabout road should be, and single-click. WME now creates the roundabout and will remove all segments within it.
For an oval shape, hold Shift while moving the cursor outside. - Enter the City name in the “Edit” menu left. A street name isn’t necessary and can be set to “None”, unless there is a official street name and there are addresses.
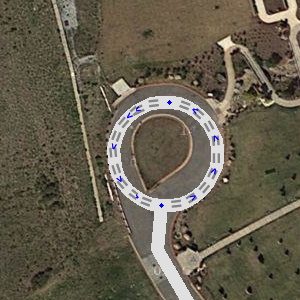
Normal vs complex roundabouts
Waze supports two different styles of roundabout navigation instructions. One style instructs simply to turn or continue at the roundabout, while the other instructs how many exits one must pass before leaving the roundabout. The US editing community terms these two instruction styles as “normal” and “non-normal” respectively. The term “normal” is used here in its mathematical sense to mean “orthogonal”, “perpendicular”, or “at right angles”.
This section will explain the difference between a normal and a non-normal roundabout.
Normal roundabouts
Require all of the following
- 2-4 nodes.
- All exit nodes aligned within “normal” range of the entry node
- A diameter less than 50 meters
Provide the following instructions:
- “At the roundabout turn right”
- “At the roundabout continue straight”
- “At the roundabout turn left”
- “At the roundabout make a U-turn”
Example:
“at the roundabout, turn right”.
Non-normal roundabout :
- Require at least one of these conditions:
- 5 or more nodes
- Nodes outside the normal roundabout angle range
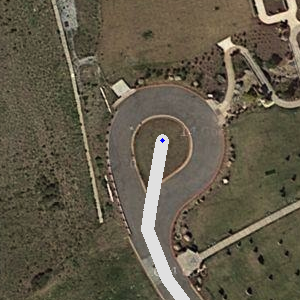
- A radius greater than 25 meters (82 feet) as indicated when drawing a new roundabout; diameter greater than 50 meters (164 feet) as indicated by WME RA Util
- Comprise the following:
- “At the roundabout, take the nth exit”
Example:
“at the roundabout, take the first exit”.
For a more detailed information about the difference between normal and non-normal RA, please consult the US Wazeopedia on the matter.
When NOT to use a Roundabout
Roundabouts in WME will yield specific routing instructions to drivers, such as “at the roundabout, take the third exit”. If those routing instructions could confuse drivers, the Roundabout tool should not be used.
-
Cul-de-sac
-
No roundabout
-
Correct use

Roundabouts should never be used for cul-de-sacs or other dead end streets, regardless of how round they are. A single road segment leading to a cul-de-sac should be drawn as a dead end. With very large roads it might be advisable to create a loop, but not a roundabout.
Remarks
- If the roads approaching the roundabout meet the criteria for At-grade Connectors, make the roads divided where they will connect to the roundabout.
- Where road changes do not match aerial imagery, leaving a map comment is advised, for other editors.
- The road type of the roundabout is always the same as the highest road type connected.
- Enter as Speed limit the highest maximum speed of the connected segments.
- Don’t connect more than one same direction segment on to 1 junction of the roundabout
- Don’t make connections within the roundabout. This lead to weird instructions, like “take exit zero”, or no instructions at all.
Tools
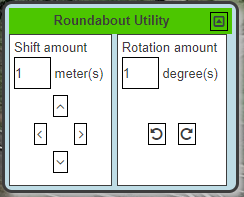
For moving and resizing a complete roundabout without losing traffic data, the Roundabout Utility Script (WME RA util) can be used.